
Prerequisite:
Create BizTalk application 'BizTalkServerTutorial’as mentioned in Part1 and
Create the following folders:
1. C:\BizTalkServerTutorial\FileDrop\SourceLocation
2. C:\BizTalkServerTutorial\FileDrop\DestinationLocation
3. C:\BizTalkServerTutorial\FileDrop\SampleOutput.txt(A file containing some random text).
Charan: I have a problem, one of my applications is dropping some output files at a folder location (C:\BizTalkServerTutorial\FileDrop\SourceLocation), but another application needs these as input at some different location (C:\BizTalkServerTutorial\FileDrop\DestinationLocation). Can BizTalk help me here?
Rohit: Though BizTalk is not a tool to do such kind of data transfer.But this is a very simple application to show you how BizTalk works. So follow these steps to get it solved.
In ‘BizTalkServerTutorial’ application create a new receive port as shown below

Specify the name of the receive port as ‘RP_SourceApplication’ as shown below

Next create a receive location as shown below

Specify the name of the receive location as ‘RL_SourceApplication_FILE’. Select the transport type as ‘FILE’ [see here you are choosing FILE adapter because you need to receive the file from file system]. Pay attention to ‘BizTalkServerApplication’ as ‘Receive Handler’. ‘PassThruReceive’ as ‘Receive pipeline:’

Next clock the ‘Configure…’ button to configure the properties for receive FILE adapter. Set ‘Receive Folder’ as ‘C:\BizTalkServerTutorial\FileDrop\SourceLocation’. Set ‘File mask:’ as ‘*.*’ and get out of the box by clicking on Ok button.

Then click ok button on ‘Receive Location Properties’ dialog box.
Then click ok button on ‘Receive Port Properties’
In ‘BizTalkServerTutorial’ create a new send port as shown below

Specify the ‘Name:’ as ‘SP_DestinationApplication_FILE’ transport type as ‘FILE’ and click the ‘Configure..’ button to configure the ‘FILE Transport Properties’. In ‘FILE Transport Properties’ specify ‘Destination folder:’ as ‘C:\BizTalkServerTutorial\FileDrop\DestinationLocation’ and ‘File name:’ as ‘%SourceFileName%’.

Next ‘Enable’ the receive location ‘RL_SourceApplication_FILE’ as shown below.

And test the receive location by pasting a copy of file ‘SampleOutput.txt’ at folder location ‘C:\BizTalkServerTutorial\FileDrop\SourceLocation’
Charan: the file get deleted from the source folder but I have not received it at destination folder. Why?
Rohit: That is expected I have done it intentionally to show you the BizTalk error logging mechanism and the structure of BizTalk message. Check Application event viewer and see the error details

Notice the error details “The published message could not be routed because no subscribers were found…”. So BizTalk work using the publish/subscribe pattern. The message received from source location get published to the BizTalk Message Box but nobody is subscribing, in such cases the BizTalk log the error in the Application event log to notify. Let us see the BizTalk message structure.
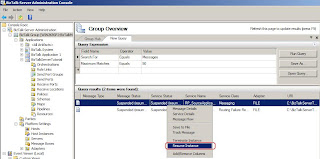
Go to ‘BizTalk Group’, go to ‘New Query’ tab choose ‘Messages’ from ‘Search For’ drop down and click ‘Run Query’. You will see the 2 suspended messages. Right click on the first one and choose ‘Message Details’ to see the message structure.

Each message has ‘Context’ and ‘body’. ‘body’ contain the content of the file, whereas ‘Context’ contains the message properties like name of receive location, adapter type used to receive message etc. some of these properties are ‘promoted’ e.g. ‘ReceivePortName’.

Promoted properties can be used for creating the subscription. Let us see how to create the subscription. Open the ‘Send Port Properties’ dialog box by double clicking the ‘SP_DestinationApplication_FILE’ send port and set the filter as shown below i.e. by setting ‘BTS.ReceivePortName == RP_SourceApplication’.

Next ‘Enlist’ the send port as shown below [upon enlisting the send port a subscription get created in BizTalk message box stating that a copy all the messages received having promoted context property ReceivePortName with value ‘RP_SourceApplication’ need to be routed to this send port] and after that ‘Start’ the send port.

Now ‘Resume’ the suspended message with ‘Service Status’ ‘Suspended (resumable)’ you will get the file at the destination location.
 Summary

You have seen
How to create receive port
How to create send port
How to create subscription for a message using Filters
The structure of the message in BizTalk and what the context of message contains
The structure of the message in BizTalk and what the context of message contains
How to use FILE adapter
How to use BizTalk MMC to query the suspended messages
How to use BizTalk MMC to query the suspended messages
How to resume suspended messages
Cheers,
Cheers,
Rohit Sharma
9 comments:
This is certainly a great hello world example. Thank you very much :)
Thanks for feedback. I am glad to know that my posts are helping others.
Rohit
A great blog. A lot of things to learn ( i am just starting with BTS ).
Thanks and congratulations.
John E. Rincon
Medellin, Colombia.
johnerincon@hotmail.com
Thanks John for your feedback.
without a doubt best to the point help for a newbie than anything around... Many thanks for making it easy to understand when all others make it more complicated than what it should be, it is complicated for sure that's why this sample is even more valuable.
Kindest regards and thanks for your efforts.
Bico Bielich
Thanks Bico for a nice feedback and good to know that you found this post helpful!
I am new to biztalk
u r blog helped me a lot understanding
thanq very much
great post.
Very helpful material. Thanks mate!
Post a Comment