Charan: I have a problem. One of our client wants to send our application an XML message and want to receive the acknowledgment for the same. Moreover client want to use HTTP protocol for this communication and our application don't support HTTP . Is there a simple way to do this through BizTalk.
Rohit: hmmm interesting problem. Yes, in BizTalk all you have to do is to create Request-Response Receive Port using HTTP adapter. You can use BizTalk to communicate with your backend application.
Let me show you, through a demo application, how you can achieve this on 64-bit machine win Windows Server 2008.
1. Configure BTSHTTPReceive.dll in IIS 7.0
In Internet Information Services Manager console click on Handler Mappings
Then click on Add Script Map... In Add Script Map dialog box specify the required information as shown below:-
Note: If you are having 32-bit OS then the path in Executable: should be '<BizTalkInstallationDirectory> \HttpReceive\BTSHTTPReceive.dll '
Click OK to close the “Add Script Map” window, a warning windows will then appears, Click Yes Button.
2. Create application pool in IIS 7.0
In IIS Manager Console create application pool using .Net Framework Version 4.0 and configure it with identity having appropriate access to BizTalk databases.
In Advanced Setting dialog box for application pool set 'Enable 32-bit Applications' to false.
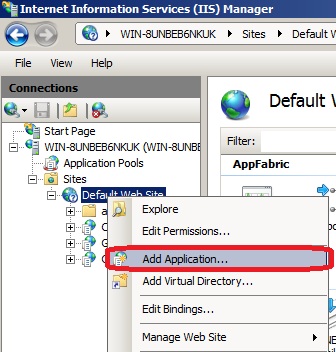
3. Create Virtual Directory in IIS 7.0
In Add Application dialog box specify the following application:
Alias: HTTPDemoApp
Application pool: Name of Application Pool created in step 2.
Physical Path: <BizTalkInstallationDirectory>\HttpReceive64
Note: <BizTalkInstallationDirectory>\HttpReceive in case of 32-bit.
4. Create BizTalk Application
Open the BizTalk Server Administration Console and create a new BizTalk application with name 'HTTPAdapterDemo'
5. Create Request Response Receive Port
Create a request response receive port with name RP_ReceiceMessage as shown below:
Create RP_ReceiceMessage_HTTP receive location as shown below. Use HTTP adapter .
Configure HTTP adapter as shown below:
6. Create Dummy orchestration to act as back-end application
Create new BizTalk project with name 'BizTalk.HTTPAdapterDemoApp'.
Add Schema 'Message_XML.xsd' to project as shown below:
Add a dummy orchestration that will set the status filed of message to Approved if Quantity is less than 500 and Denied otherwise.
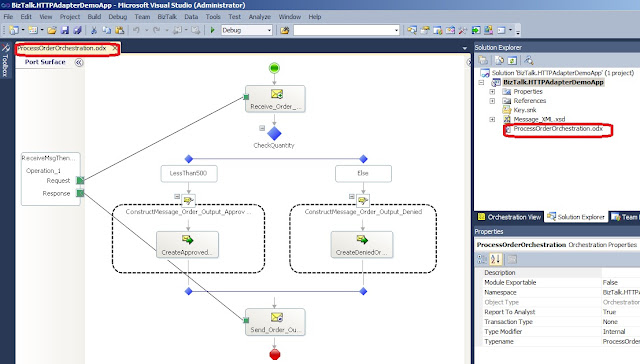
Follow these steps to create the dummy orchestration:
6.1: Add orchestration to the project
6.2: Create two messages in orchestration and sepcify Message_XML as Message Type as shown below:
6.3: Create a request-response port for receiving message and sending response by following the steps shown below:
6.4 Drop a receive shape and configure it as shown below:
6.5: Drop a decide shape and configure the IF portion as shown below:
6.6: Drop a Message Assignment in IF block and configure the construct shape enclosing the message assignment shape as shown below:
6.7: Configure the message assignment shape as shown below:
6.8: Drop a Message Assignment in ELSE block and configure the construct shape enclosing the message assignment as done in step 6.6 and configure the message assignment shape as shown below:
6.9: Drop a Send shape after decide shape and configure it as shown below:
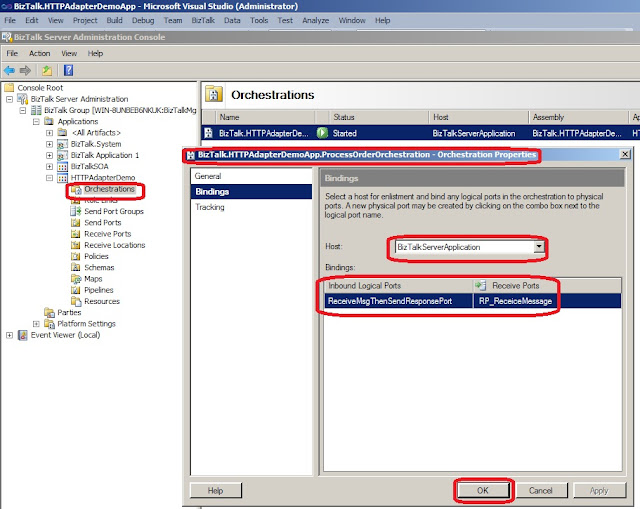
Deploy this solution and configure the orchestration and attach the logical port to 'RP_ReceiveMessage' created in step 5. Start the HTTPAdapterDemo application created in Step 4.
7. Test the functionality
Create C# console application and use the following code
static void Main(string[] args)
{
WebRequest request = null;
WebResponse response = null;
if (args.Length < 1)
{
Console.WriteLine("Please specify the name of XML file as argument");
return;
}
try
{
//The path of Virtual Directory created in Step 3
string uri = "http://localhost/HTTPDemoApp/BTSHTTPReceive.dll";
request = WebRequest.Create(uri);
request.Method = "POST";
request.ContentType = "text/xml";
StreamWriter writer = new StreamWriter(request.GetRequestStream());
//args[0] should contain the path of XML file complying with schema Message_XML.xsd
StreamReader reader = new StreamReader(args[0]);
writer.WriteLine(reader.ReadToEnd());
reader.Close();
writer.Close();
response = request.GetResponse();
Console.WriteLine(ReturnString(response.GetResponseStream()));
}
catch (WebException webException)
{
Console.WriteLine(webException.Message);
}
catch (Exception e)
{
Console.WriteLine(e.Message);
}
finally
{
if (request != null) request.GetRequestStream().Close();
if (response != null) response.GetResponseStream().Close();
}
}
static string ReturnString(Stream stm)
{
byte[] buffer = new byte[1024];
StringBuilder strBldr = new StringBuilder();
int count;
while ((count=stm.Read(buffer, 0, 1024)) != 0)
{
for (int i = 0; i < count; i++)
strBldr.Append(Convert.ToChar(buffer[i]));
}
return strBldr.ToString();
}
Cheers,
Rohit Sharma